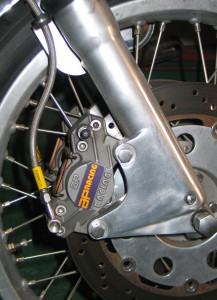
1. Norton Commando double disc conversion.
From time to time we get the same inquiries about various aspects of motorcycle building. Brakes is one of those subjects. People come into the workshop, phone or email saying ‘my brakes are spongy and how can I fix them’ or ‘my brakes work, but what can I do to improve them’.
Photos no.1 shows my Commando double disc conversion. It features twin “RGM” 12 inch discs with “AP Racing” calipers mounted on “Norvil” sliders. The master cylinder is “AP Racing”. Believe me the bike stops.
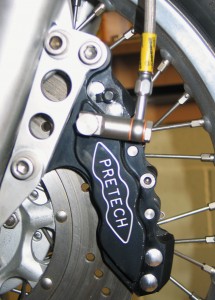
2. Pretech six pot caliper mounted on a Honda CB750 four.
Photo 2. shows my Honda CB 750 four featuring a single “Pretech” six pot slim back caliper operating off the original disc and master cylinder.
Both of the above are vast improvements on the original brakes. However some people are very reluctant to even touch the brakes as they think it will cause them to fail and crash as soon as they ride the bike. It really is not that complicated, but if you are at all unsure of you own knowledge or abilities it would be best to speak to us or bring it in for us to work on.
The most common faults which lead to poor brake performance are the following:
- Air in the system is the most common of them all. This is caused by the brake not being bled properly after a rebuild, or a loose connection on the hose lines, banjo bolt or bleed nipple allowing air into the system.
- Sticking pistons in the brake caliper allowing the pad to constantly run on the disc, causing friction and heating the fluid. The fluid boils and generates air bubbles so leading to spongy brakes.
- Leaking fluid from the master cylinder seals or piston seals allows air into the system.
- Worn out or tired brake hose. These degrade over a period of time so leading to greater expansion of the hydraulic fluid and loss of performance.
Obviously these are the four most common problems. Physical damage, like an accident can also lead to problems or just bad positioning of a brake hose leading to it rubbing on another part of the machine.
SERVICING YOUR BRAKES: Once you have stripped your brakes, clean them thoughly and blow small oil ways through. Cleanliness is important as any dirt will cause damage to seals and reduce performance. Once reassembled with new seals, ensure firstly that all connections are tight. Use new copper washers on banjo bolts and make sure the bleed nipple is clean and not blocked with road crap. It is common for them to get blocked, especially if the caliper is mounted under the swinging arm, where it is punished by road dirt. This position on the bike will also be rough on the pistons and this is often the cause of seizure. Some bikes will have gaiters on the pistons to help protect them, but nowadays this is not often the case.
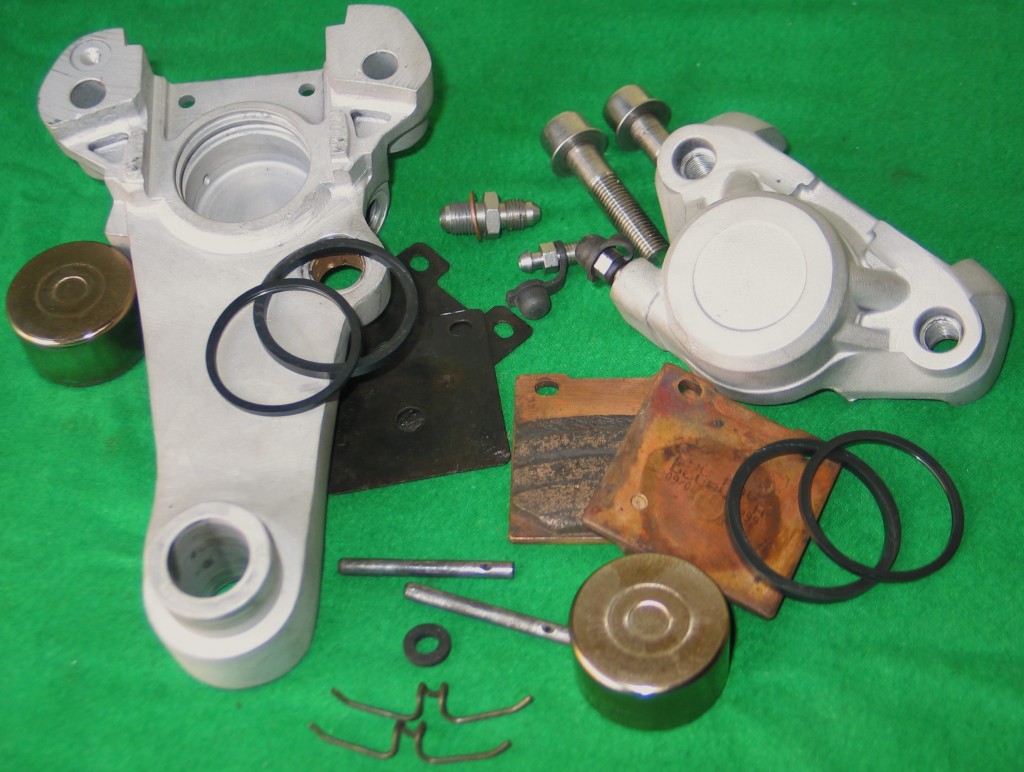
3. Rear brake stripped and cleaned for re-assembly
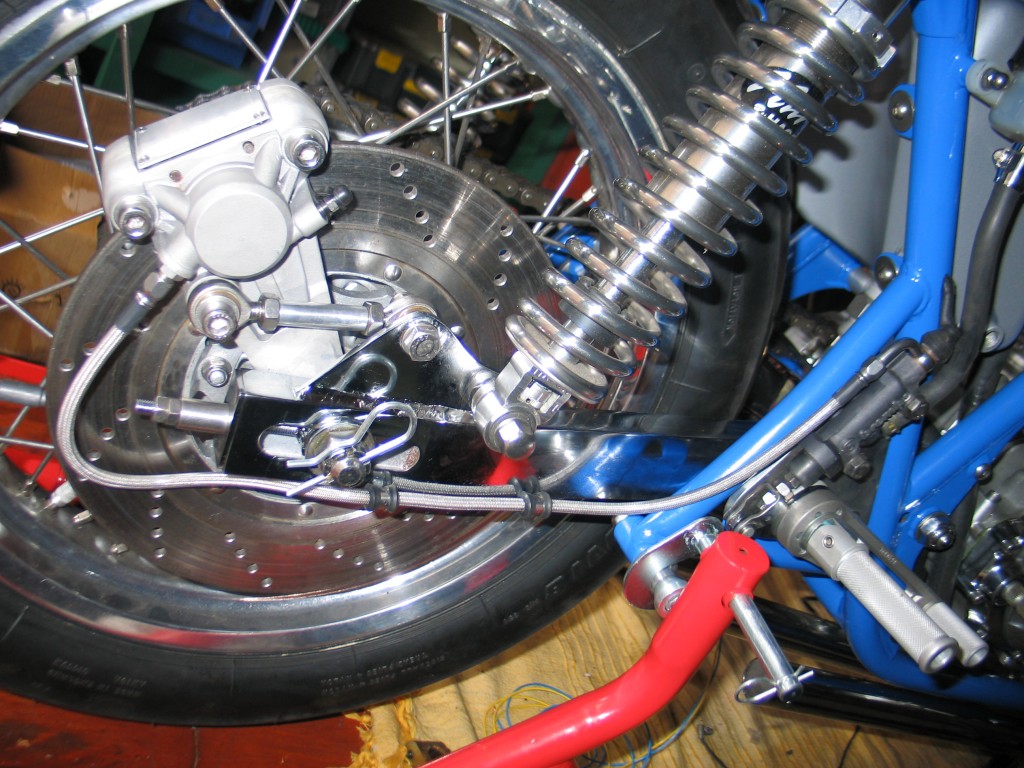
4. Finished rear brake assembled on the CB750 cafe racer project. Modified from an early Suzuki RGV250.
Speaking of equipment for bleeding, I have always used a length of clear plastic tube only, no non-return valve or fancy pressurised kits are really needed. Just ensure the tube is tight on the nipple head and long enough for the end to sit in the brake fluid bottle. However it is easier to bleed with two people.
The procedure: No.1 presses the lever down. No.2 opens the nipple, allows fluid and air out, then shuts the nipple. No.1 then lets the lever out. The cycle continues until all the air is removed and the brakes are firm. Every so often stop and just pump the lever to see how firm it is getting. Obviously the fluid is topped up as you go. A problem you may encounter is that the fluid may become air rated and fully of tiny air bubbles. In this case just leave it to settle for few hours before going again. It amazing what an overnight break can do for an air lock. Some calipers have two bleed nipples for each side of the caliper and this can be useful for easy removal of the air.
If you are still having problems getting the air out, stop a while, check the system for oil tightness, if all is OK then sometimes hanging the brake caliper with the bleed nipple at its highest point and tying the lever back under load over night can help.
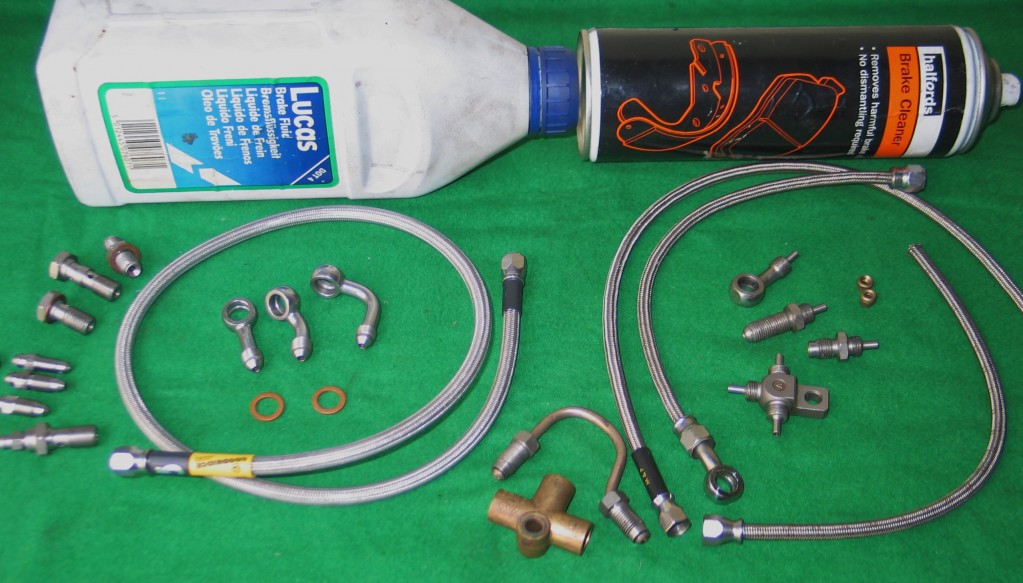
5. Various brake fittings
BRAKE FITTINGS : Most people nowadays upgrade their old rubber hose with new higher strength braided hose. I use “Goodridge” build-a-line hose now as it much easlier to fit and is easily obtained off the shelve from most motorcyle shops now. You can see the new build-a-line hose on the left in photo 5. The older hose, on the right in the same photo, was harder to fit as the banjo had to be postioned exactly in the right position for it to prevent the hose being twisted when fitted. With this new hose you simply bolt your banjos in position and then screw the hose on. Motorcycle shops sell it in all the common lenghts and it comes in 25mm increments. Banjos are also sold in various angles.
By Colin Jones

hey there superb little blog ya have right here 😉 I use the very same theme on my own yet for whatever reason it looks to reload quicker on this website although this blog includes far more content. Are you making use of different plug ins or widgets which will speed it up? If you might be able to reveal the plug ins so that I can use these in my personal blog so twilight breaking dawn users could watch twilight breaking dawn online trailers and clips a lot quicker I’d be happy – kudos in advance 🙂
I am glad you are enjoying the blog. We are a bit Ludite here as regards computers. We are still learning about widgets and plug-ins. We tend to like things that are older and you can see working, but we have an open mind. Hopefully we will work it out evenually.
Cheers Colin
Good journey and experience!
great share, great article, very usefull for me…thank
you
yea i read about this in the? yahoo insider news and this is awesme.
Its really nice post thanks.
Terrific work! This is the type of information that should be shared around the web. Shame on the search engines for not positioning this post higher!
lol o . k . so this is how ridiculous I am, halfway through looking through your post I dropped my sensitive mouse and shut the site by mistake and I could not find your site once again right up until 3 days later on to finish reading from the point i stopped at simply because I did not remember how I linked here in the first place haha anyhow it was worth the hold out..kudos 🙂
Excellent blog. Yahoo! h9f5tRaG
Very interesting point that you make. Google 8ena2ruT
can I copy this info for my site?
Thanks ADMIN.
Many thanks for sharing this wonderful post. Please hold up this weblog as ensure that it is an example of my preferred web site in my reader, with thanks
Been looking for this article for long time ago and finally found here. thanks for sharing this post. appreciate!
A thoughtful insight and ideas I will use on my blog. You’ve obviously spent some time on this. Well done!
What a well written article. I spend days on the internet reading blogs, about tons of different subjects. I have to first of all give kudos to whoever created your website and second of all to you for writing what i can only describe as an unbelievable post. I honestly believe there is a skill to writing articles that only a few posses and frankly you have it. The combination of informative and quality content is definitely extremely rare with the large amount of blogs on the internet.
The most concise and informed tips I discovered for this subject. I am sure glad that I stumbled on that web page by chance. I will be opting-in to the rss feed so that I can have the most current posts. Like the information here.
Downloading material from this web page is as effortless |as clicking the mouse rather than other websites which shift me here and there on the web sites.
I want to to thank you for this excellent read!! I definitely loved every bit of it. I have you book marked to look at new stuff you post…
A pleasant surprise, it occurs seldom, but the following we can speak of a real bonus value towards person who reads.
Pingback: acne cyst
Pingback: louis vuitton france
the comments come from all over the world, we don’t pay for them.
Those are some good bits right there. But I should think any approach to the CB750F1 or other SOHC/DOHC Honda CB750F/CB900F/CB1100F or GL1000-GL1100-GL1200 etc – should always look at the hub weight and seek to reduce the rotor diameter as well as weight. Anybody considering this as an “upgrade” over the ‘K type DRUM hub should know the facts, and if they still insist on doing it they should have their head examined. It’s an absolute boat-anchor of a hub. Just the center core hub section alone weighs the same as the center of the Suzuki GT750J 4LS drum hub – which itself is much maligned as a boat anchor of a useless brake “upgrade” – Well the CB750F1 rear disc hub is even WORSE as I’m not even adding in the weight of the sprocket-carrier/cush-drive let alone the rotor & caliper!
I’ve got “a few” rims for my CB900K0 Bol Bomber wire-spoke conversion, some drilled for the Honda rear hub and others drilled for the HARLEY rear hub – for which I intend to do the “Front Hub Trick” with a bolt-up cush-drive and a spacer for a rotor adapter etc. Now THAT’S gonna have a smaller disc on it alright. Maybe the 260mm front rotor from CB350F/CB400F, ’cause I’m shooting for a whole “period-correct” look for this bike, a “retro-fried” style in keeping with the theme, that of a tribute to the ’65 CB450K0 Black Bomber – (hence the name)
ANYWAY – for the version of the rear wheel that I’m whipping up with the CB750F1 rear hub, I’m looking at various rear calipers but an obvious first choice would be the 276mm size from the CBR1000F Hurricane etc, just a couple of years later and done up in the same style right down to the holes in the caliper-hanger etc. So the rotor could either be cut down to the new diameter, OR – there are replacement rotor kits from “Metalgear Australia” where they treat your old carrier to a powder-coat and fit a replacement outer disc. They’ve got options for all of these 9-rivet carriers in both 296mm and 276mm, cross-drilled in all sorts of interesting patterns. So yeah, I suppose one could use a GL1000/CB550 front rotor bolted to the rear disc’s carrier. If you were to find one in good shape. It’s not a HUGE change, but it should shave some un-sprung mass & rolling inertia, yet keep the original aesthetics – ‘Cause that’s how Honda SHOULD have done it in the first place – dual 296mm rotors up FRONT, and 276mm as the absolute outside max diameter on the rear brake.
THIS is the type of thing to look at first, when dealing with ’75-’85 Honda rear disc brakes.
Now – as for the LINES – My front brakes came with two full-length stainless-braided hoses, with a double banjo bolt at the master-cylinder. Seems like an alright upgrade, until you consider it’s just a stainless SLEEVE over another rubber hose. Possibly the best feature of hoses like this would be the inner tube of polyethylene – for those which have it. I’d rather have a braided hose which has the reinforcing material IMPREGNATED into the hose itself. Not a fancy sleeve on the outside. Functionally, that’s only gonna grab & restrict the inner hose once it’s already ballooned all out of shape! The sleeves would have to be pulled really tight and stretched into the clamp fittings at the ends.
But I’m more concerned with the idea of two full-length hoses rather than the T or Y fitting. Sure, it’s probably a lot easier to bleed, though if you’re using good technique you shouldn’t have a problem with bleeding the hoses anyhow. (Seriously!)
Look at it this way – The two full-length hoses are how a good 7-8 feet long in total. The flex in the lines is now going to be the flex factor times that length. So you’ve gotta ask – What’s the factor of greater stiffness in the new stainless braided line, as compared to the original rubber lines? Given that the two full length lines are now 1.3 times LONGER than the original set-up, it’s gotta be at least that much better just to be EQUAL.
And that’s not even the original line either, that’s another aftermarket line. ‘Cause the original lines had a good length of STEEL brake tubing down at the caliper ends!
So let’s consider the original METAL brake hoses – The stretch factor on those things is what? ZILCH.
MY ideal dream set-up brake lines would incorporate those metal tubes down at the calipers, doesn’t matter whether it’s my current CB900F 39mm fork with CBX pro-link caliper hangers for the two-pot sliding calipers, or the GL1500 41mm TRAC fork with 20mm axle that i’m swapping it out for as soon as I can make the 200km round trip to pick it up – with the late ’80s style sliding twin-pot calipers – or anything else heck even with some crappy looking USD fork off of some fugly plastic modern crotch-rocket, I’d wanna use a line like this on those brakes too!
How about a short flex-line from the master-cylinder to the top yoke, then a rigid line down to the bottom yoke, then either an additional flex line from the bottom yoke to the fork brace or two of ’em if you want to put the splitter at the top – it’s either at the top or the bottom of the suspension travel, either the extra span of flex-line in the mix OR you’re adding that splitter to the un-sprung mass and it’ll travel with the wheel as it bounces – then I’d want the hard line down at the bottom connecting to the caliper as well.
Even with the OEM rubber hose up your nose, the total length of flex line in this system could be about a foot and a half long, max. More like a foot or even less.
THEN you’d be able to feel the “caliper flex” etc and get a full feed-back sensation, or at least you’d benefit from the full travel of your brake lever!
-Sigh.
Saw a REAR brake-line on a Bimota once – it was an add-on that didn’t originate with Bimota themselves SFAIK – It was in an issue of Classic Motorcycle Mechanics” or “Motorcycle Classics” circa 2004-2007-ish and the article was about two Bimotas in Northern Ireland.
Anyhow, it was a combined brake-line torque-arm. A solid tube with two flex lines at either end. The fluid was carried down the length of a hollow Aluminum rod!
So I’ve got this old IKEA floor-lamp from the ’80s or early ’90s – I’ll have to dig up some old IKEA catalogues and get ya’ll the name of the lamp – “IVAR” rings some bells. And yeah, they’re sorta like the usual hollow “lamp rod” but beefier and a larger thread size, female ends and it’s a seam-welded steel pipe. They’re about the right length for the CB900F swinger (or the original CAL-FAB arm on my “CB900K0 Bol Bomber”) I’ve just gotta figure out the right FITTINGS for the things. Each lamp comes with nine rods in the kit. Gotta find some clevises and ideally “T” fittings so the crush-washers on the banjo fittings don’t have to deal with the compression/release cycles of the torque-arm.
Imagine how rigid a brake line like THAT would be! Heck, even just a rigid automotive style brake line run clamped to the swinger, with a flexible line on each end where it’s required only for assembly & maintenance plus the movement of the rear suspension.
It’s been a dream for some time now, to put this type of torque-rod on the bike. I suppose it might be just as sensible to find some type of machined Aluminum rod to convert, rather than dig up the exotic fittings suitable for the IKEA lamp. But then again, there’s a perverse pleasure to be found in using “found object” parts to fix an old motorcycle. Especially if they’re period-correct!
I’ve gotta dig up that old magazine – the two bikes were on the cover, something about “Italian Flair” or some such – I’ve gotta dig it up so I can scan the image of what I’m talking about here. It’s a really awesome mod. Everybody’s gonna forget about stainless brake lines as soon as THIS type of stuff catches on!
-Sigh.