What types of four stroke lubrication systems are there?
There are four main types that are used on four stroke motorcycle engines:
- The splash or spray system
- The total loss system
- The dry sump system
- The wet sump system
1. The splash or spray system of lubrication: This was employed in the earliest days of engine development. The system comprised a sump or crankcase with a set amount of oil enclosed within it. As the rotating crankshaft and connecting rod dipped into the oil at the bottom of the stroke it picked up and lubricated all of the lower parts of the engine. This type of lubrication under went small design modifications. These included a rod which extended down vertically from the big end bearings, dipping into the oil in the sump and therefore picking up a little more oil. There were several designs of these. There are also accounts of con-rod and flywheel modifications. These were done for the sole purpose of getting the oil higher up the crankcase. The inherent side effect of this system of lubrication is that the crankshaft was subjected to oil drag as it splashed through the oil in the bottom of the engine.
These early engines employed mainly white metal and plain bronze bearings with crude seals. They were slow revving, being low in performance as well as in crankshaft and gearbox speed. As engines developed, the customer and therefore the manufacturer required more speed and with this came higher revs. The stroke of the latter day engines had to be shortened to attain these revs. With the increase in revolutions came increased performance and higher piston speeds. Basically all the internal workings of the engine were subjected to higher rotating and reciprocating speeds.
Oil development and improvement had crept a long with improved engine designs. The ball type bearing had replaced many of the plain bearings and seals were becoming more effective. A more modern lubrication system was required the keep up with the performance changes.
2. The total loss system: was employed for these more advanced engines. They used a simple oil pump that was hand operated. A typical vintage motorcycle users manual of the day stated that at normal riding speeds (20mph) one pump of oil was needed for every eight to ten miles and at higher speeds (30mph) a pump was required every six miles. The oil for the pump was fed from an oil tank. Before starting one of these engines you had to give it a pump of fresh oil. This topped up the splash lubrication system in the sump, which was still being used, and took care of the bottom half of the engine. Drip feed lubricators were often used in conjunction with hand pumps and were normally set to eight drops of oil per minute.
When using just the manually operated pump, the early motorcyclists sometimes it was found that the engine would run faster if less pumps were given, but only for a short while. This was due to there being less oil drag on the piston and other moving parts. If you were lucky you could flood the engine with a couple of extra pumps to make up for the lost ones that had given you the extra performance that all the early motorcyclists craved for. Oil had to be be more accurately governed and manufacturers decided if this could be done their engines would be more reliable, therefore not leaving a bad reputation for reliability in the hands of their customers.
3. The dry sump system: was one of the first to be mechanically governed. This system uses two pumps. One feeds oil from an oil reservoir under pressure to lubricate the engine before dropping into the sump. The second pump or scavenge pump then picks up the oil to return it to the reservoir, sometime via the transmission or other parts of the engine that require lubrication. you will find on dry sump engines the scavenge pump is double the size of the feed pump. You should be able top see the scavenge pump working by removing the oil tank filler cap and observing oil being fed back into the tank.
When dry sump engines are laid up for a while there is a tendency for them to back flow on the scavenge side (wet sumping). When you start the engine with a dry sump that has sat for a while and you cannot see any return flow coming into the tank, pour a pint of oil in and wait until you see return flow activity. Then adjust the oil level with a siphon or draining.
4. Wet sump lubrication: was the next development and removed the necessity for an oil tank. It seems to be the most popular system for Japanese motorcycle manufactures. The oil is contained in the crankcase sump, however it is separated or masked from the crankshaft, so as to prevent oil drag and any frictional losses from the oil splash. A pump oils the engines vital components and returns the oil via a filter back to the sump for recirculation.
What types of oil pump are there?
There are four types of oil pumps commonly found on motorcycles. These are:
- Gear oil pumps
- Piston oil pumps
- Centrifugal pumps
- Trochoidal pumps
1. Gear oil pumps operate by circulating oil through a set of gears, with the gears being closely meshed within a housing of bronze or aluminium.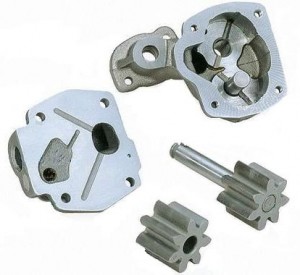
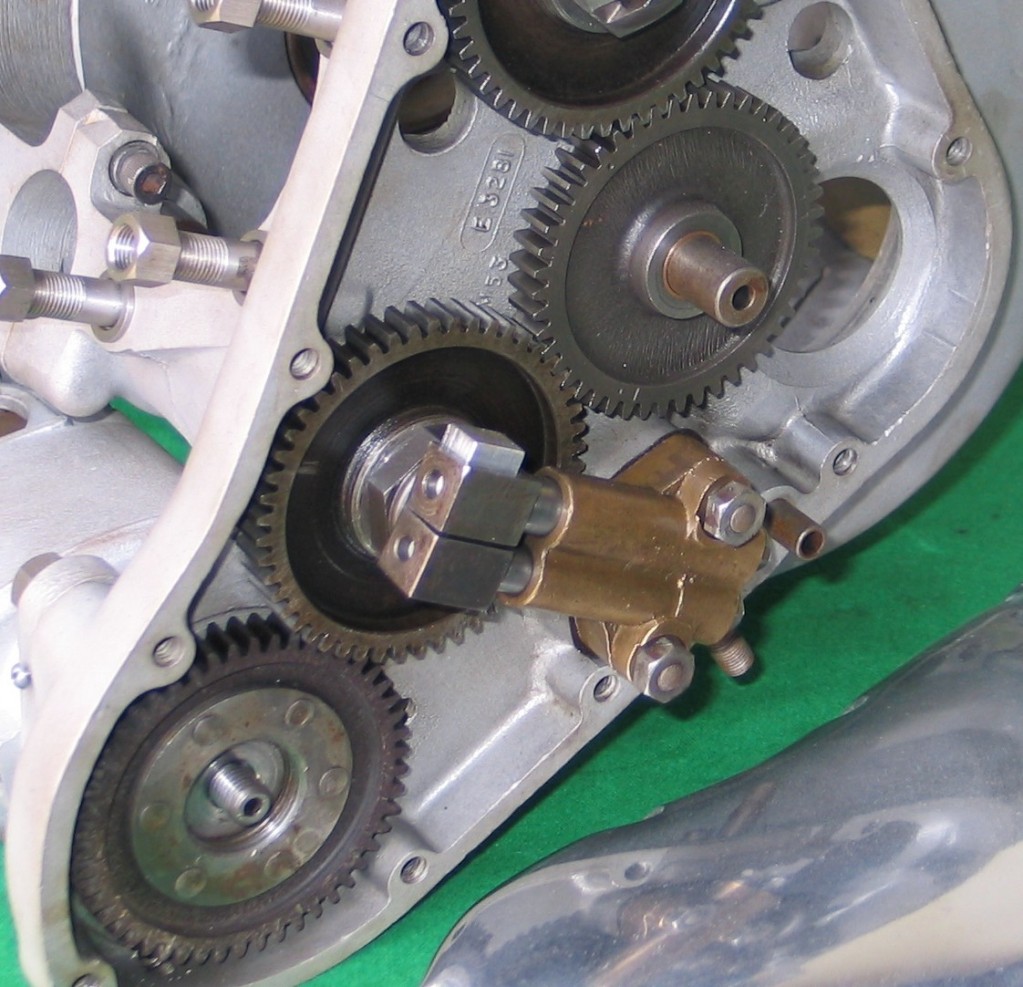
2. Piston pump fitted to a Triumph Tiger 100 being restored here at the workshop.
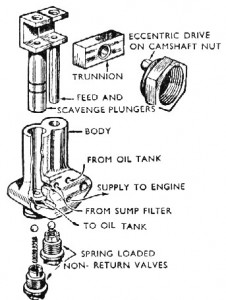
2a. Exploded view of a piston pump.
4. Trochoidal pumps work with a star shaped gear attached to the end of a shaft. The gear is rotated within a metal body which has the same star shape cut into it, but bigger. The body of the pump, usually steel, also rotates within another housing, which is usually aluminium and machined into the engine cases. Oil enters the body and is pressurised in between the finely machined faces on the star and is forced around the engine via outlet ports.
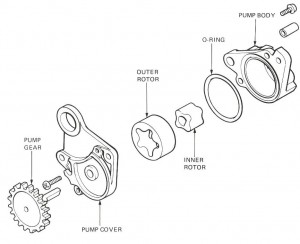
4. Trochoidal pump components. This is the most common now for modern motorcycles.
Oil pump restoration and repair
When repairing oil pumps, whether it be for cars or motorcycles, the first thing that has to be done is t o remove it from where it is fitted. The next thing to do with the pump while it is a complete unit is to look at its overall condition. Are the any knocks or dents that might have occurred while removing it. These dents may cause distortions or bad running clearances on shafts or gears within the their housings. When you look at a pump dents or knocks are not always clearly evident, as the may be black oily residue covering the pump body. These oily residues can usually be scrubbed off with petrol or paraffin. Here at Stotfold engineering we aqua-blast them clean. This helps identify any marks on the pump casings. The pump internals are washed in paraffin and blasted with high pressure air.
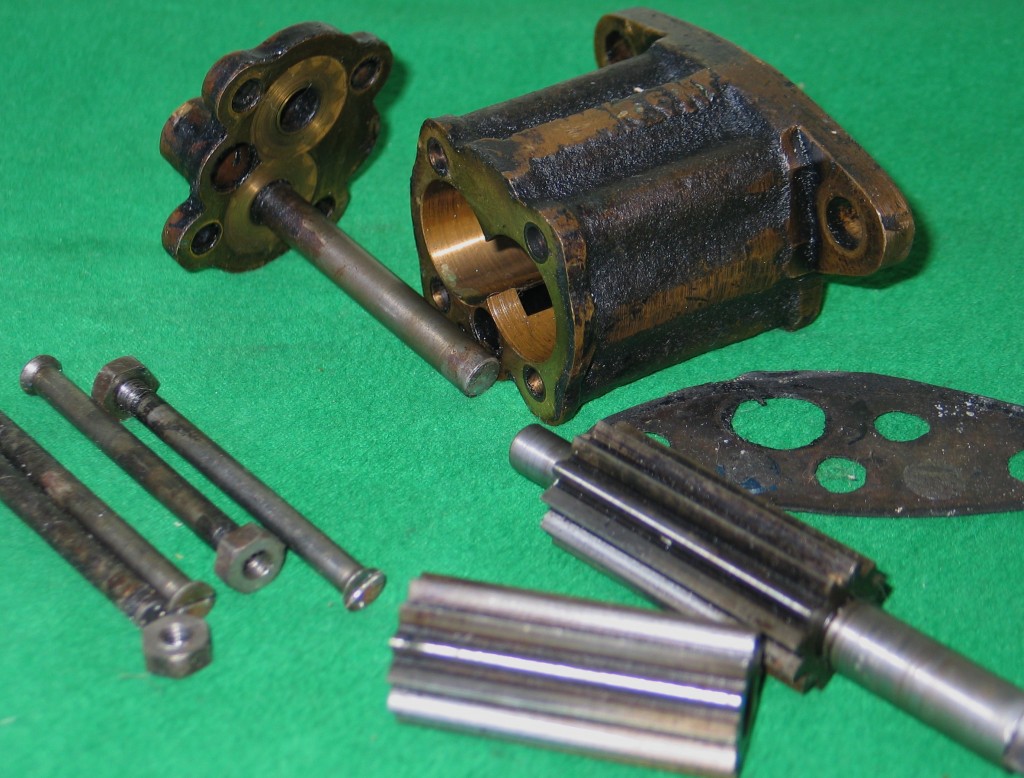
A gear pump stripped for restoration.
Prior to aqua-blasting the pump should be stripped down completely. Take notes on how it come to pieces and lay the parts out, so that you recognise them for reassembly. Use a digital camera if you think you will forget. Once all the parts are laid out it is time to clean and inspect them, taking note of wear and running clearances. When we rebuild pumps we always set running clearances to 0.001″. This leaves enough gap for hot oil to get between all of the running and pumping parts. It is worth taking into consideration that if any parts such as spindles or pinions are worn, they can be precision ground to just clean them up. The holes they run in can be then bored out and bushed to suit the new spindle diameter. I have not yet found a pump that could not be restored.
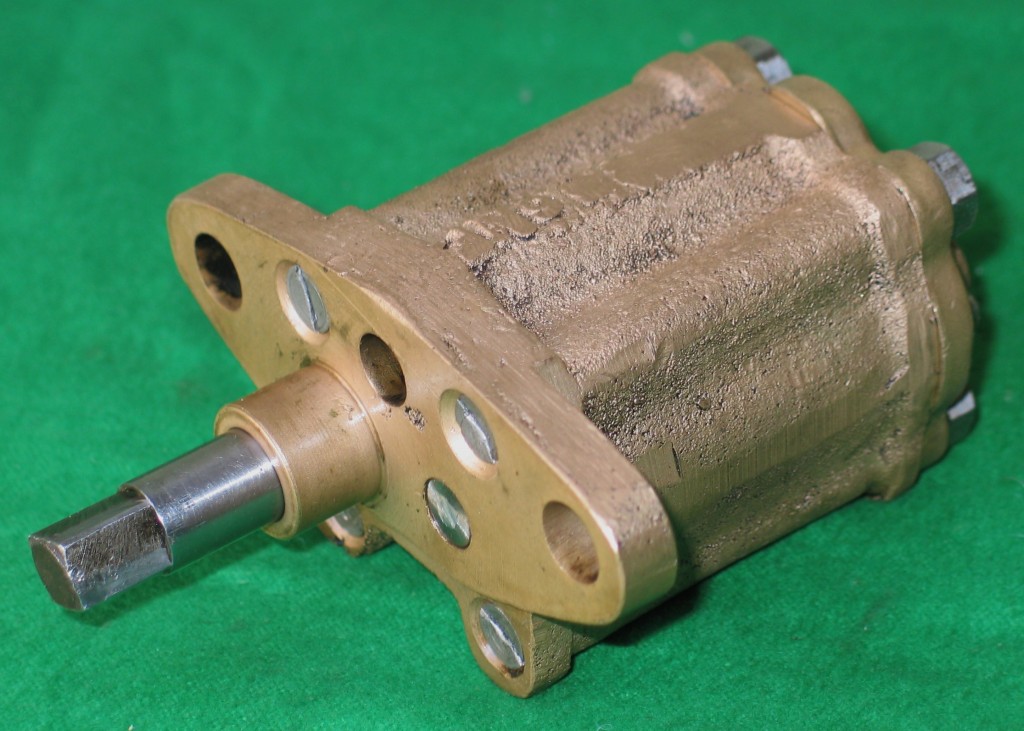
Fully restored oil pump completed by us.
It is now time for reassembly. Each part has been meticulously cleaned and checked. Once reassembled, with any nuts replaced or wired up if necessary, it is time to oil it and run it to see if there are any tight spots. This can be done using a drill on low speed. Then check the it operates freely using just your hand. It should run freely. You can now reinstall the pump.
By Terry Ives

Really appreciate you sharing this blog. Great.
This will be an incredibly gravid resourcefulness that you are rendering and you pass on it away for free. I relish seeing websites that be aware of the value of rendering a prime resource for free. I truly enjoyed reading your Wiley Post. Thanks!
Pingback: breast actives scam