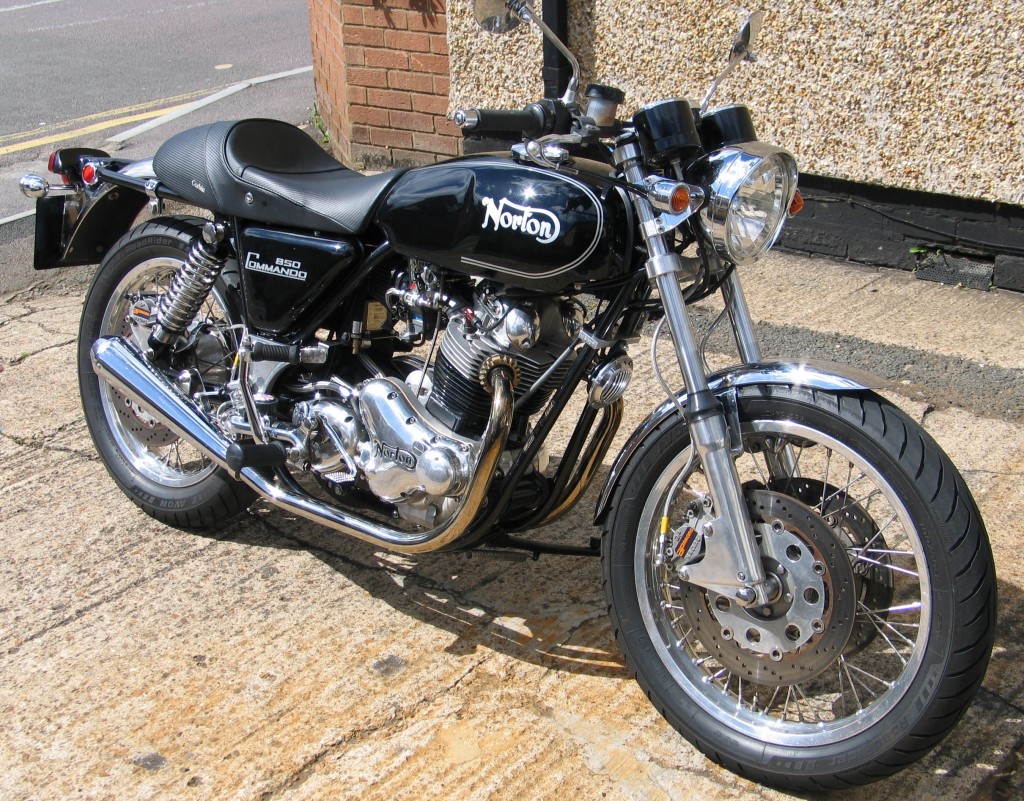
1. My Commando as it looked following its return from a 1500 mile trip to Scotland in 2008
In this blog I just wanted to tell some of you about my Commando as I ‘ve been asked about the bike by a few people. People always say “that’s a nice bike, it must have cost you fortune”. I tell them it didn’t happen overnight. I’ve been working on bits of it over the past ten years, so most of the expense is not in one hit, plus not all the parts are that expensive.
When I first saw the Commando back in the seventies I wanted one and then ten years ago I finally bought one. It was my first British bike and I was a little apprehensive about it, as I had only owned Japanese bikes from when I first rode a bike at 18. It was a learning curve and the bike I had bought was a black 850 MkIII interstate from 1977, just like the one I had seen all those years ago. Then I rode the bike and knew it would need some of the inadequacies ironing out, so I resolved to fix the following.
The front brake
The first thing I noticed was how bad the brakes were. The standard brakes are appallingly wooden and have the stopping distance of a oil tanker. Mine had come with the Norvil 12″ disc and Locheed caliper conversion as well. After a year of riding with this set up I decided I has to improve the situation, so I could really enjoy riding the bike without having to think if I have allowed the 300 foot gap every time I braked. I decided to throw some cash at it and bought a double disc hub and 12″ floating discs from RGM in Cumbria. Front and rear wheels were rebuilt at Hagon’s and I dropped the rear one down to an 18″ wheel. The silders I got from Norvil. I didn’t buy their brake kit as I thought it looked to modern and out of keeping with the bike. I initially fitted the standard Locheed calipers, but these require the brake pads to be modified, because they hit the floating disc pins. Later I purchased the smaller racing Locheed calipers which fitted perfectly. The master cylinder, which is a lot of the problem with the standard bike was replaced with the racing Locheed master cylinder. Because the brakes were so much better I also upgraded the internals of the forks with progressive fork springs and improved dampers. I could now ride the bike with the confidence of knowing I’d stop.
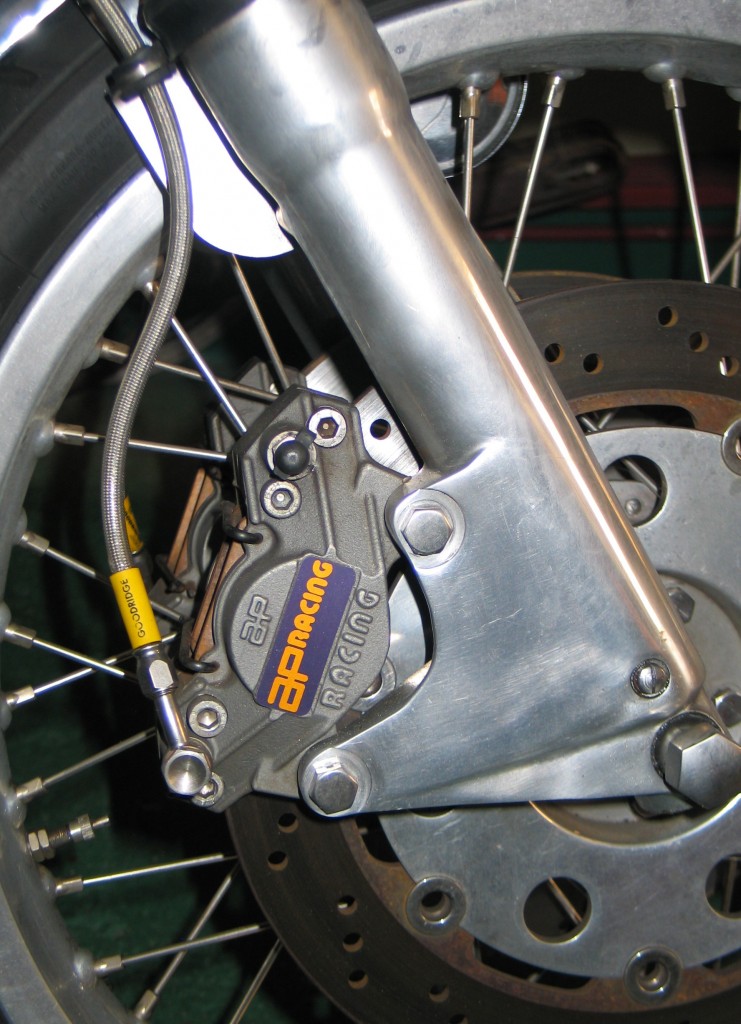
2. Does it stop? – Oh yeah!!
The riding position
The other thing I found annoying with the Commando was the seat and riding position. The wind blast would want to push you down the seat and it felt like your feet needed to be 6″ further back. I did look at rear-sets, but these all seemed a bit Heath Robinson. I decided to change the bars initially to lower ones which seemed to help. When I purchased the bike I was given a King seat with it and I decided to give this a try and it was very good over long journeys, but not the most pleasing in the eye. I would solve the riding position later in 2007 with the purchase of a Corbin saddle and flatter bars. I will talk about the 2007 rebuild later.
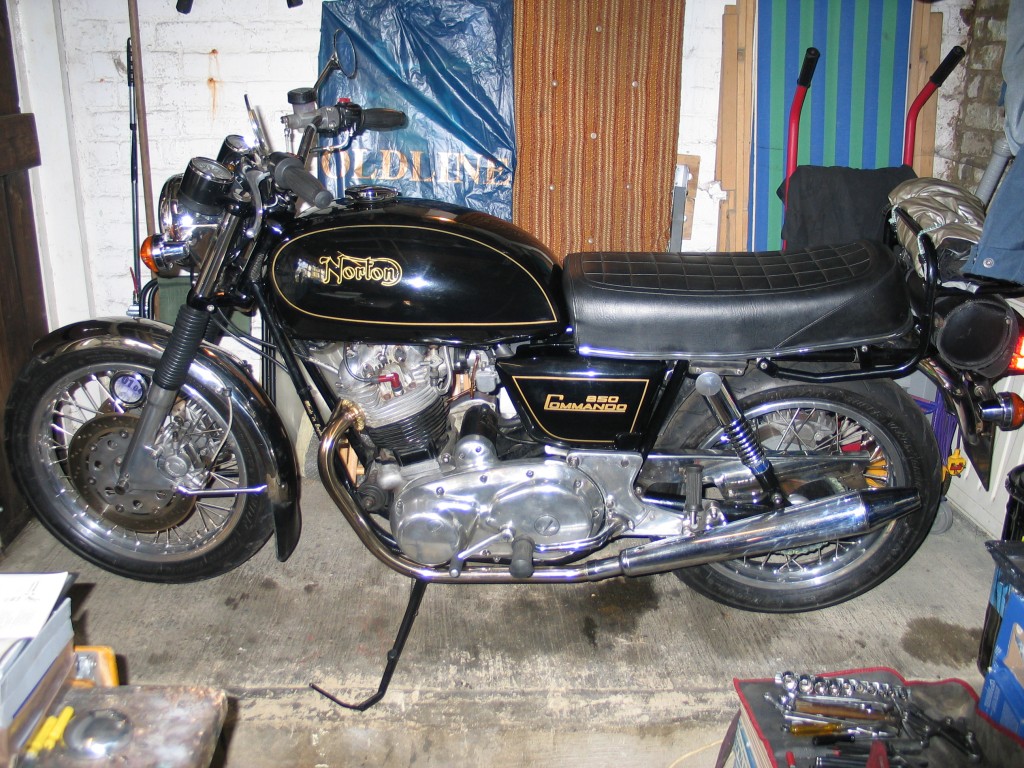
The clutch set-up
After a while of ownership I found the clutch to quite heavy. I decided to try a belt driveset-up, as people told me it was kinder to the gearbox and the clutch would run dry. I purchased a belt drive kit for the MkIII from RGM. I installed it, but it soon became apparent it did not work. The problem is that the MkIII has a fixed gearbox, so the belt was almost impossible to tension correctly, even with the modified RGM gearbox bolt. The starter sprag clutch also ran very close to the belt. In the end the belt chewed itself up on the sprag, the metal wire coming out of the belt and damaging the stator. I went back to the original primary design. The left hand gearchange crossover shaft also adds to the problem and if you are thinking about a belt primary for a MkIII my suggestion is you loose the starter motor and buy an earlier gearbox cradle which is adjustable, in fact just leave the primary standard or get a MkIIa.
The diaphragm clutch also can be tricky. I have lost count of how many times I have had the clutch apart. I have had it slipping and dragging. I have tried metal plates, surflex fibre plates and bronze plates, having problems with them all. I now use modified surflex plates. Oil is also critical here I’ve found. I use Castrol automatic transmission fluid. The problem I was getting was that the plates were hydraullically locking together. I would be sitting at the lights and suddenly the bike would be moving forward, until I pumped the clutch lever a few times to free the clutch. I solved this by cutting grooves in the surface of the surflex fibre plates and using metal plates with holes in them. The oil was then able to freely flow off the surface of the plates. The keeper plate I changed for a thicker light alloy one, which I got for the failed belt drive kit, and it seems to now be working perfectly. I am now happy with my clutch, but having talked to other owners I think each clutch is a very individual affair.
The 2007 rebuild
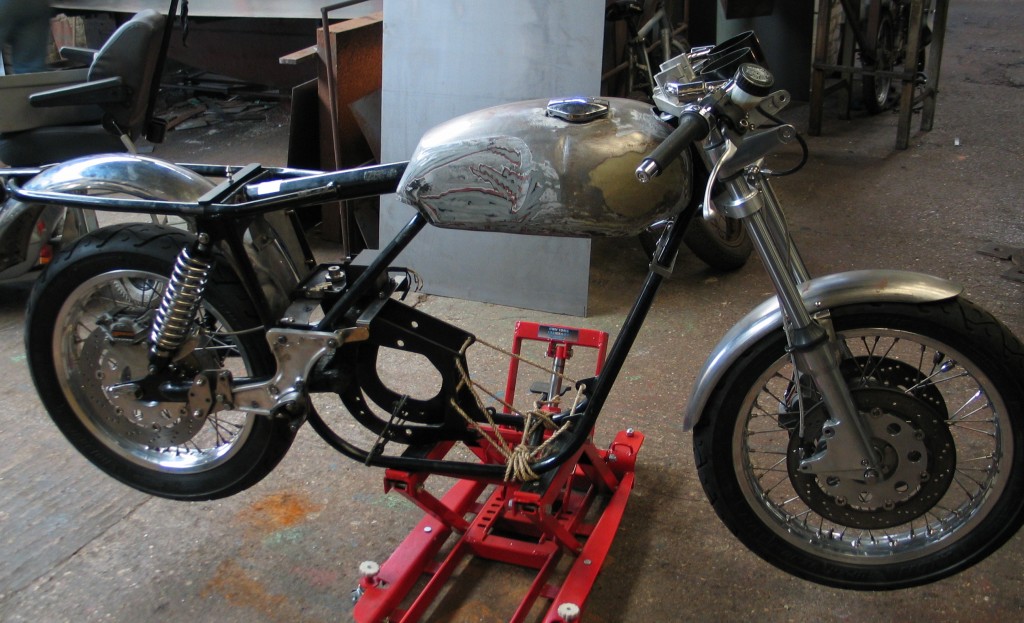
In 2006 I decided it was time the bike was re-modelled and refurbished. I wanted it to be ready for the NOC Isle of Man International Rally in July of 2007, so I began the refit. I had been looking at a website called Norton Colorado and was very impressed by the styling and want to model my bike in that style. I was going to cost a lot of money, so I sold my sports bike to fund the build. There was not going to be enough time to build the engine and gearbox myself so I gave it to Mick Hemmings to do. I had him put the 5 speed gearbox shaft in as well. While he did that I concentrated on the rest, which would still be a lot of work.
The brakes;The wheels had already been done previously at Hagon’s and the front brakes were just requiring the new race calipers. For the rear brake I obtained a RGM rear brake mount in alloy, however because I had also decided to run Hagon ‘Nitro’ shocks it needed to be modified to fit. Once this was done I then fitted a matching 12″ floating disc with Locheed racing caliper, so both front and rear brakes matched.
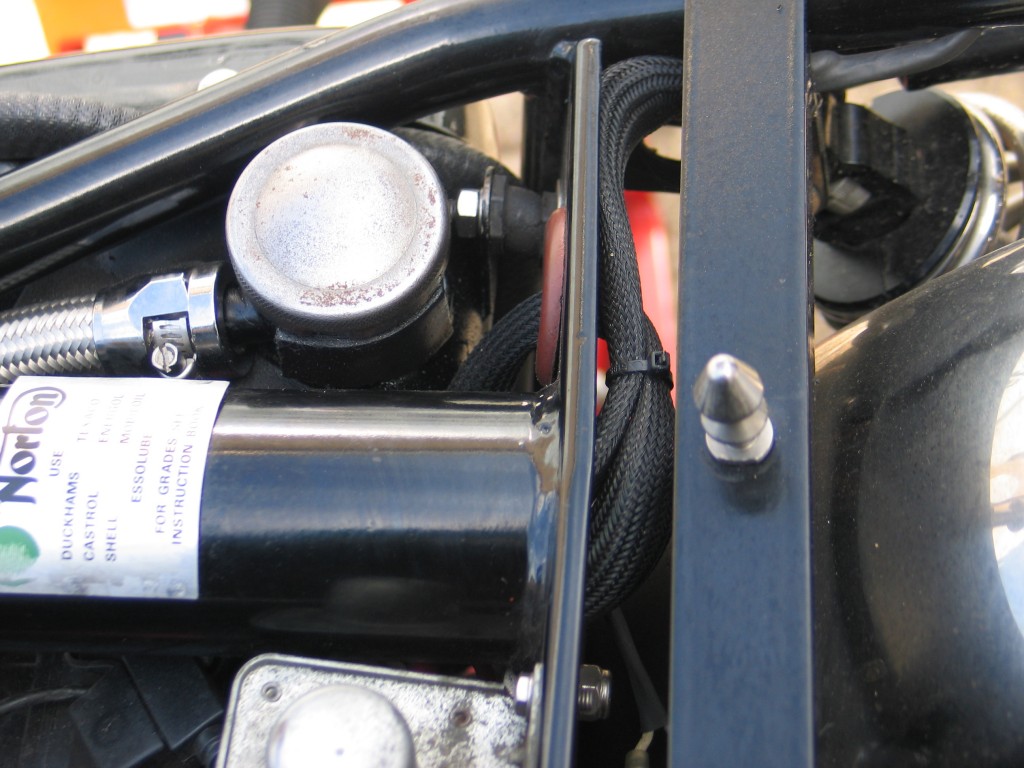
5. Wiring runs up the main frame tube
The chassis;I decided to modify the frame by running the wiring in the main tube (see photo 5.). The spine of the frame was opened at the back end near the rear mudguard, so you could see right up the frame tube. A hole at the top was made so that the wiring could come out. Holes were also made at the rear for the tail light wiring, and brake light. The tops of the shock absorber mounts were cleaned and tidied as there was not going to be a hindged seat anymore. The ‘Corbin’ saddle mounting bar was fitted. As this was going to be a roadster now the tank and seat were fitted to ensure everything had clearance. At this stage all the frame repairs were done, to the side stand mount and the side stand spring mount. I decided to despense with the main stand. The tail light was replaced with the earlier unit with the reflectors on the sides as I thought this was a lot more shapely than the later square one. I made two holes in the rear loop to hide the wiring for the rear light, I certainly didn’t want cable ties on it. The front mudguard was changed to a cleaner steel one, which would be chromed later.
Getting it right; As I’ve said in previous articles it is important at this stage not to rush it. You need to think about where the wiring will run and how it will look. Dry build the whole thing before you paint and polish, so you know everything fits and works. Obviously it is not necessary to wire the bike, but ensure there is enough room for the wires and they will not snag or be crushed on things. Also remember the rule: MAKE THE COMPONENT FIT THE BIKE NOT THE BIKE FIT THE COMPONENT. Something make look cool and trick but if it doesn’t look right don’t use it. How often have you seen a bike beautifully built and spoiled by a ridiculous tail piece sticking up in the air at the wrong angle to the rest of the bike. I myself have bought items which I thought were great and really wanted to see them fitted to a bike, only to look at afterwards and think, why did I put that on. Most generic aftermarket or custom components will require some modifications to fit and after you have fitted it stand back and ask yourself “does it look like the factory built it like that”. If the answer is yes then you probably cracked it, but just to be sure get a mate to give you an honest answer. Sometime you spend so long on a bike you loose the plot. I find putting a cover on it every so often and have a rest from the build helps a lot.
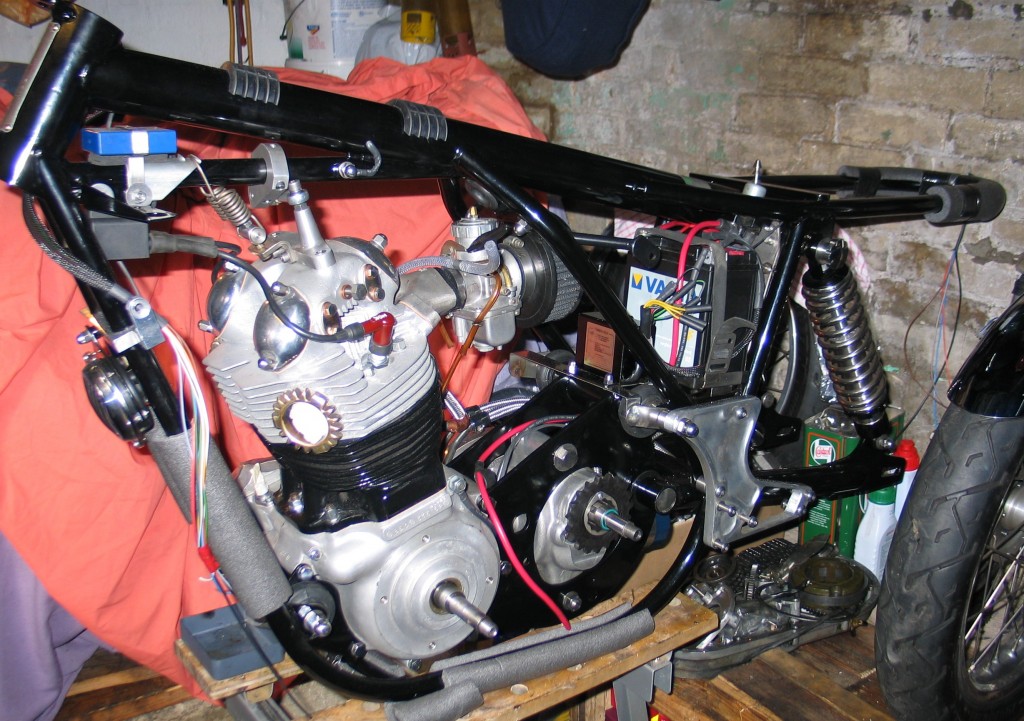
6. Recontruction continues – stainless battery box and 14amp sealed Varta battery are installed.
The electrical components;Getting back to the build, the battery tray had been modified previously when I first rewired the bike to negative earth and gave it a 3 phase generator. Terry here at the workshop had made a replica tray in stainless steel, but modified to mount the Boyer power box and a larger 14amp Varta sealed battery (see photo 6.). I upgraded the ignition to the Boyer Branson Micro digital ignition system form the standard boyer, mainly because I had heard about its smoothness on the Triumph T140 and the fact it replaced the Lucas coils with a smaller one coil unit. It seems to function really well and not had any problems with it. Even though the starter motor I had was a 4 brush converted one, with the 3 phase and 14amp battery it still did not work properly, so I lashed out and got a new modern starter motor from Norvil, its perfect now. The headlight I got from ‘M & P’ for £35 complete with bulb. Its an absolute bargin and is a modern flat one which gives you so much more light. The indicators were £9.99 a pair and come two different lenghts. You don’t have to pay a lot of money to look good. The ignition barrel is from a Honda 750 four; you can get these new and they are simpler and more realiable than Lucas. The switch gear I liked when I first put them on, but it is now on my list of things to replace; they work but it looks cheap and plastic.
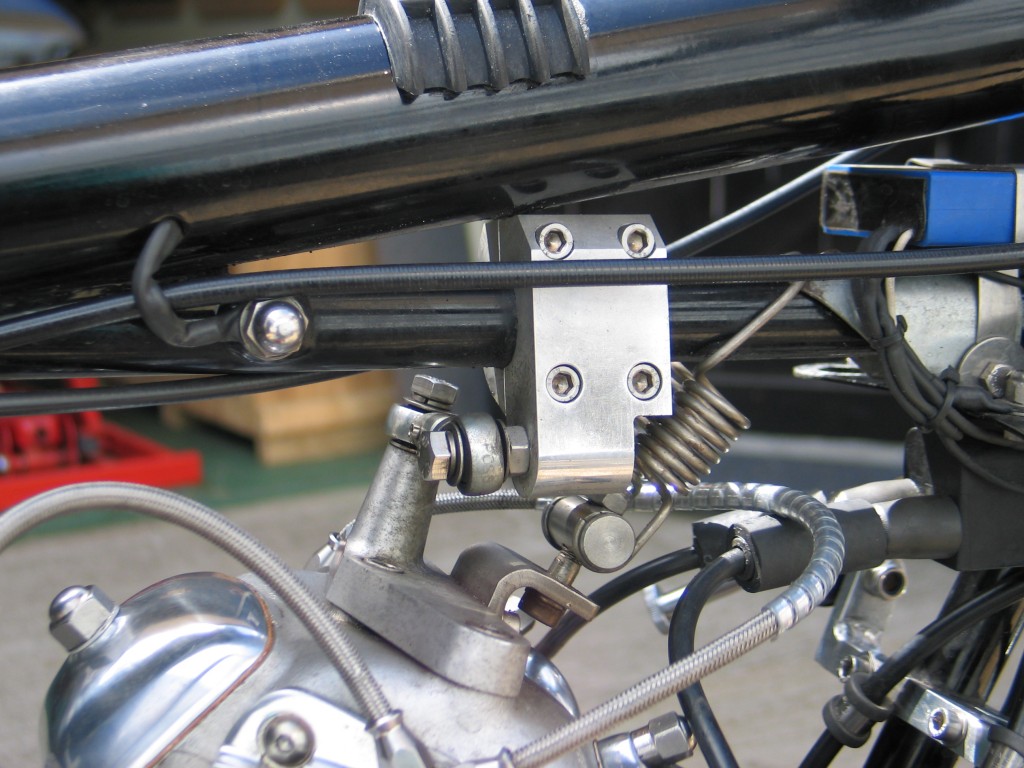
7. Re-enforced RGM head steady
Other bits & peices;The head steady was replaced by a RGM special. The main problem I found with this is the tube clamp is insufficient and having spoke to other owners they too have had problems with it moving on the frame tube where its mounted. Terry machined a bigger clamp for me to keep it in place, problem solved. The iso-elastics were all replaced with stainless items and new rubbers. The ‘Z’ plates were machined out at the bottom section and a bracket for the roadster side panels was made for an old rickman fairing mount I had knocking around. A stud was welded on the lefthand side panel so that the panel is bolted on.
In conclusion I write at considerable length on my bike because of all the changes and modifications I’ve made over the years. I still have a few things to change, which I’m not happy with and it probably will never be finished. After the Isle of Man trip in 2007 I removed the idiot lights, the mega exhausts, changed the carborettor and improved the head steady. After doing 1500 miles to Scotland I changed the carborettor again. Having just come back from Spain, doing 2500 miles I’ve now have a few other changes I would like to make. It goes on!
By Colin Jones

I glad to read this information, That is useful for me. Thank you
Greetings, I like your article. This is a informative site and I wanted to post a comment to let you know, good job!
Best wishes,
Cathy
[url=http://www.luxurygiftsbags.com]louis vitton bag[/url]
louie vuitton
Great idea for a blog site article. It really helped me out. I’m certain it helped a whole great deal of other people as effectively.
You’ve a great Website here Mate. Adore your content incredibly informative, Please keep up the good perform.
did you try a 34mm mikuni carb and if so what jetting did you use?? I’m running a 260 main and a 35 pilot, engine is way rich, may go to a 30 pilot jet. thanks
terry ’74 850 Roadster
ps..if i had the $$$ I’d send mine to CNW for a complete do-over
Hi Terry,
yes the first carb I had on it was a single 34mm Mikuni. Sorry can’t remember the jetting, but it always ran slightly rich and the choke was a pain in the arse. If it was on a mili second too long it would soot the plugs. I am happy with the 34mm MK2 Amal I’m now running, seems much better. The only bit I don’t like is the choke, but it never really needs it luckily. I’ve found you are probably best to ignore what people have suggested for jets and keep running the bike and checking the plugs until she sounds right and the plugs are a nice shade of dark brown. My Amal jettting is about the same as yours, but the pilot is much smaller 15 I think. I started with 300 main and ended up at 260 myself, but my bike has big valves which might account for some of its thirst.
Cheers Colin
PS. anyone can have a CNW bike if you have the money, but doing it yourself makes you more attached to a bike and I often think you loose a bit of it’s soul if you do that. Plus no one would bother talking to each other about how to do things, like now.
Thanks this made for intresting reading. I really like your wordpress theme, i frequently come back here and i dont know why. I just truly like your site lol… I recently read something simular to this on That Are i think they might of stolen your blog?
Hi Colin,
Thank you for a really informative, and helpful, read. Despite their well known faults, these Norton’s grab hold of you and don’t let go.
I love the headlight but am having trouble finding it on M & P’s site; do you happen to have the reference code?
Best wishes
Mick
Hi Mick,
I hope they still do it. Found the details in a 2008 catalogue. Ref.No: 558644 Deluxe chrome headlamp £35. Just found it. It is a little more expensive now. Here’s the link http://www.mandp.co.uk/productInfo.aspx?catRef=500201. Best of luck.
Cheers Colin
really wish i hadnt found this site,its just encouraged me to drag out my interstate and turn it into something usefull and a thing of beauty.The wallet is already feeling the strain with the purchase of a corbin seat and seconhand roadster tank.plenty more time,cash and patience me thinks,i shall definately be using the wiring in the frame tips. thanks for the inspiration
Pingback: micro jobs
Pingback: 手機外殼
Thank you for another magnificent post. The place else may just anybody get
that kind of info in such an ideal approach of writing?
I’ve a presentation next week, and I am on the look for such information.
A very useful reference point for similar obsessives. Having endured 35 years of under performing brakes I decided to follow a similar route on the front end. However in the end plumbed for an all Norvil route – we’ll see how that works out. Would you mind helping me out with where you located a suitable short front fender? I’m struggling to find anything suitable.
We can modify and shorten fenders to suit the particular bike.
Hi, I have 2 weeks ago bought a MK111 1975 Roadster
Good work well done hope mine turns out like your sir
Derek